Creating Amazon AMI 2023 Hyper-V Instances

Creating Amazon AMI 2023 Hyper-V Instances
Step-by-Step Guide
Introduction
Creating a Hyper-V instance running Amazon Machine Image (AMI) 2023 involves several detailed steps. This guide provides a detailed walkthrough for creating a Hyper-V instance running Amazon Machine Image (AMI) 2023. It outlines the necessary prerequisites, steps for downloading the AMI image, configuring the instance, and additional security measures.
- Prerequisites for Setup: Users need access to an AWS account, a configured Hyper-V on their Windows machine, and the PowerISO tool to create an ISO file.
- Downloading AMI 2023 Image: The Amazon Linux 2023 disk images can be downloaded from cdn.amazonlinux.com.
- Creating Cloud-Init Configuration: Users must create a NoCloud (seed.iso) cloud-init configuration to set up the instance and add users. This involves creating USER-DATA and META-DATA.
- Setting Up the Virtual Machine: The guide specifies steps to create a new virtual machine in Hyper-V, including naming, memory allocation, and networking configuration.
- Starting the Virtual Machine: Users are instructed on how to start the virtual machine and log in using the credentials set up in the seed.iso file.
- Post-Setup Security Configuration: The document advises on enabling password authentication for SSH, detaching the seed.iso, and setting the hostname.
Prerequisites
Before beginning, ensure you have the following:
- Access to an AWS account.
- Hyper-V is enabled on your Windows machine and fully configured.
- Hyper-V Instance Requirements: https://docs.aws.amazon.com/linux/al2023/ug/hyperv-supported-configurations.html
- PowerISO – you can use the eval version as your ISO we will be creating is only around 2.25MB
Steps to Create Hyper-V Instance Running AMI 2023
1. Download AMI 2023 Image
Amazon Linux 2023 disk images for use with KVM, VMware, and Hyper-V can be downloaded from cdn.amazonlinux.com
Follow these steps:
- Goto cdn.amazonlinux.com.
- Navigate to the “hyperv” folder
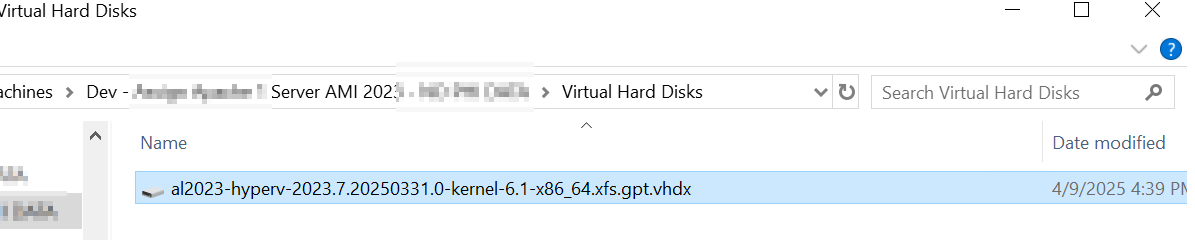
- Download the Amazon Linux 2023 LTS [Version Number] x86_64 Hyper-V image that is zipped
- Unzip the image that was downloaded
2. Create NoCloud (seed.iso) cloud-init configuration for Amazon Linux 2023
During this step, we will create the ISO that will be used on the initial startup to configure the AMI 2023 instance and add users to the Instance. If you want to geek out on the Cloud-init settings, see https://www.cloudynotes.io/blog/2024/11/02/the-grizzled.html#amazon-linux; https://docs.aws.amazon.com/linux/al2023/ug/seed-iso.html; or https://cloudinit.readthedocs.io/en/22.2/topics/format.html.
- Open PowerISO (Evaluation mode is fine)
- Click New Data CD/DVD
- Using Notepad ++ or Notepad create a file named USER-DATA with the following text (Note the file does not have an extension and there is not a black space / line at the end of the text in the file)
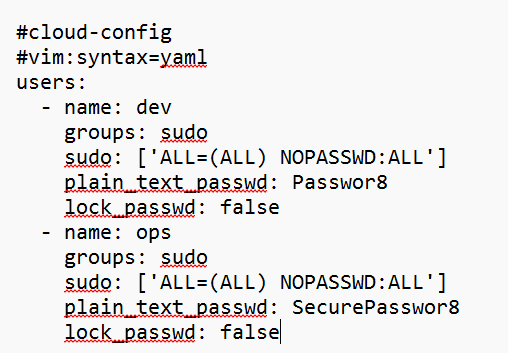
- Name sure to replace the UserName1, UserName2, and SecurePasswordGoesHere! with your own values:
- #cloud-config
- #vim:syntax=yaml
- users:
- - name: UserName1
- groups: sudo
- sudo: ['ALL=(ALL) NOPASSWD:ALL']
- plain_text_passwd: SecurePasswordGoesHere!
- lock_passwd: false
- - name: UserName1
- groups: sudo
- sudo: ['ALL=(ALL) NOPASSWD:ALL']
- plain_text_passwd: SecurePasswordGoesHere!
- lock_passwd: false
- For example, mine looks like:
- Using Notepad ++ or Notepad create a file named META-DATA with the following text (Note the file does not have an extension)
Make sure to replace InstanceName with the name you want the Instance to have. If you want to setup static IPs, uncomment the IP Sections
local-hostname: InstanceName
# eth0 is the default network interface enabled in the image. You can configure
# static network settings with an entry like below.
#network-interfaces: |
# iface eth0 inet static
# address 192.168.0.10
# network 192.168.0.0
# netmask 255.255.255.0
# broadcast 192.168.0.255
# gateway 192.168.0.1
- For example, mine looks like, because I will be using DHCP to assign IP:

- Copy those two files META-DATA and USER-DATA into the CD by dragging and dropping them in the root of the CD or using the add files. It should look like this:

- Open File > Image properties
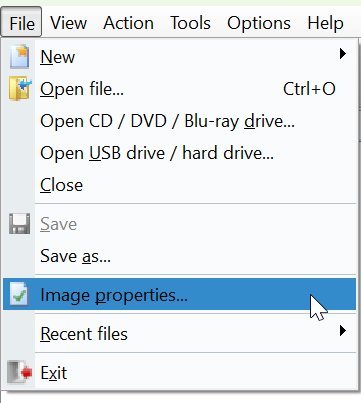
- Set Label to cidata
- Click on More Labels … and set the Volume Set ID to cidata

- Set the following settings:
- CD/DVD File System to ISO 9660, RockRidge, and Joliet
- ISO9660 File name to DOS(8.3)
- Joliet File Name to Standard(64)
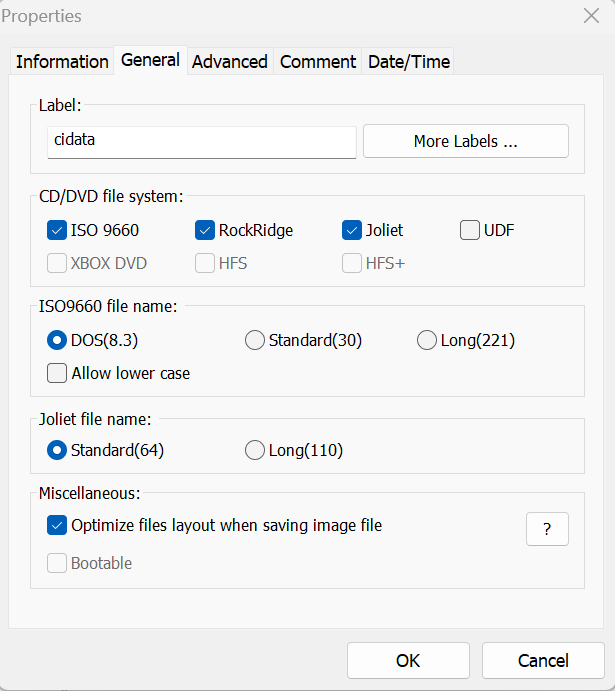
- Hit Save and save it as seed.iso
3. Create a Virtual Machine in Hyper-V
Requirements: https://docs.aws.amazon.com/linux/al2023/ug/hyperv-supported-configurations.html
Follow these steps:
Here are the steps:
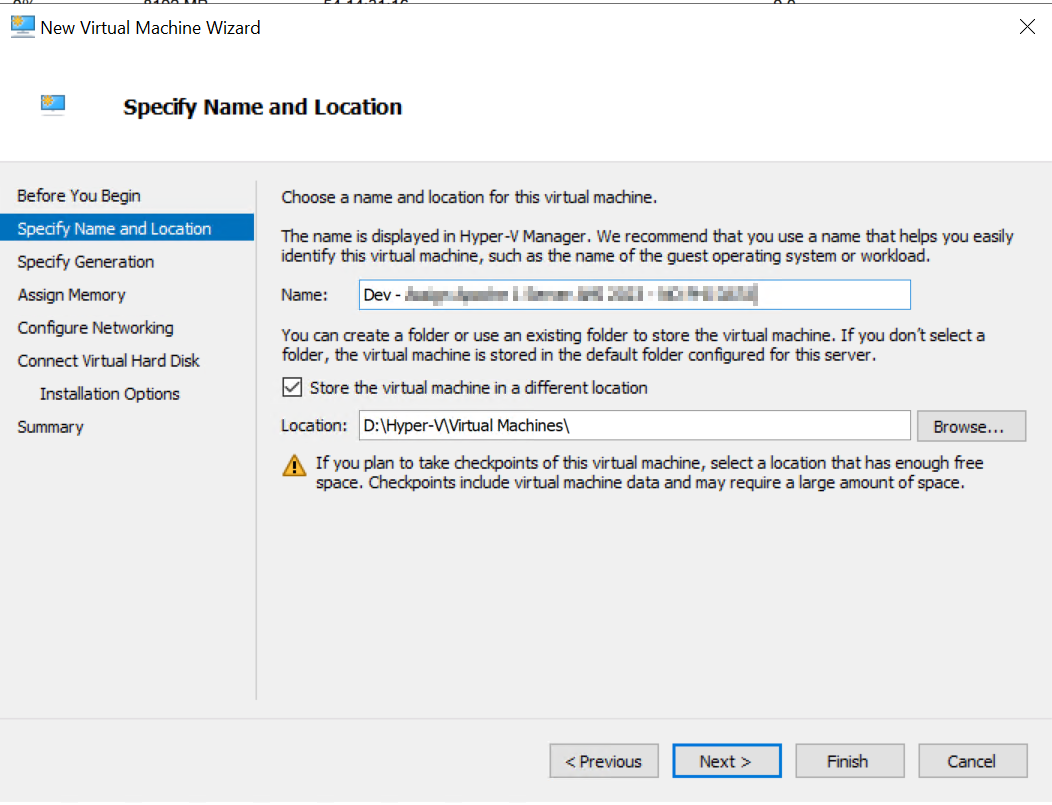
- Open Hyper-V Manager.
- In the Actions pane, click New and then Virtual Machine.
- Follow the New Virtual Machine Wizard:
- Name the virtual machine and specify its location
- The Name will become a subfolder in the location you select
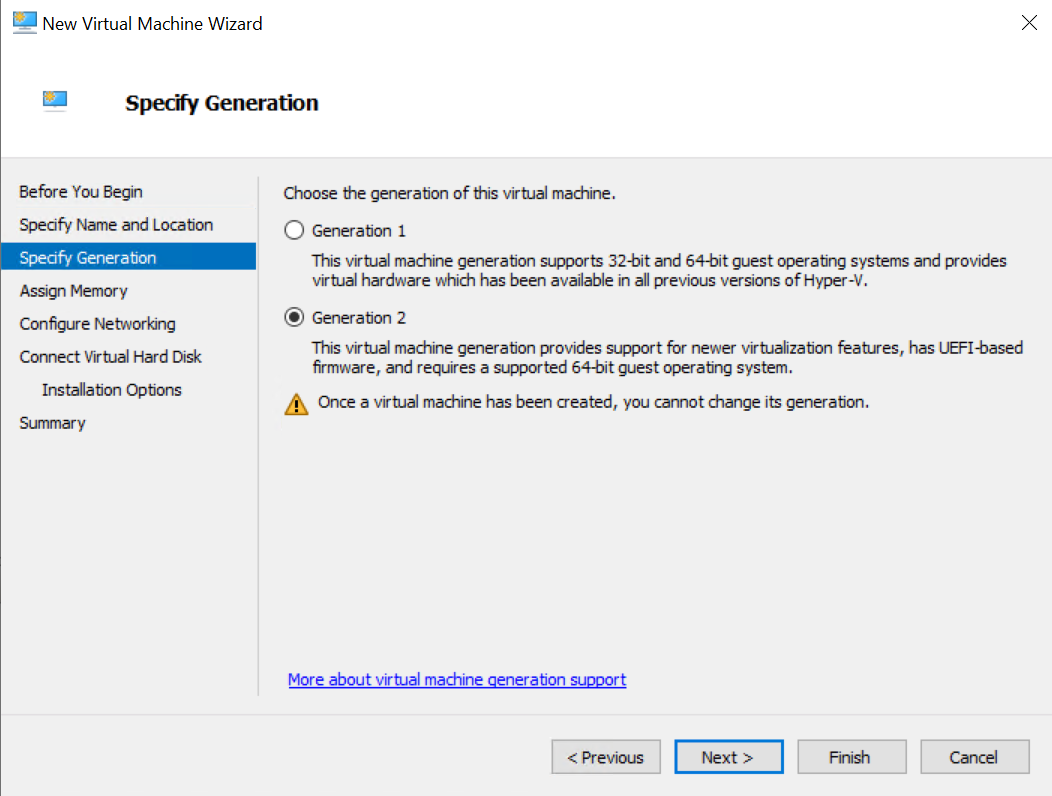
- Select Generation 2
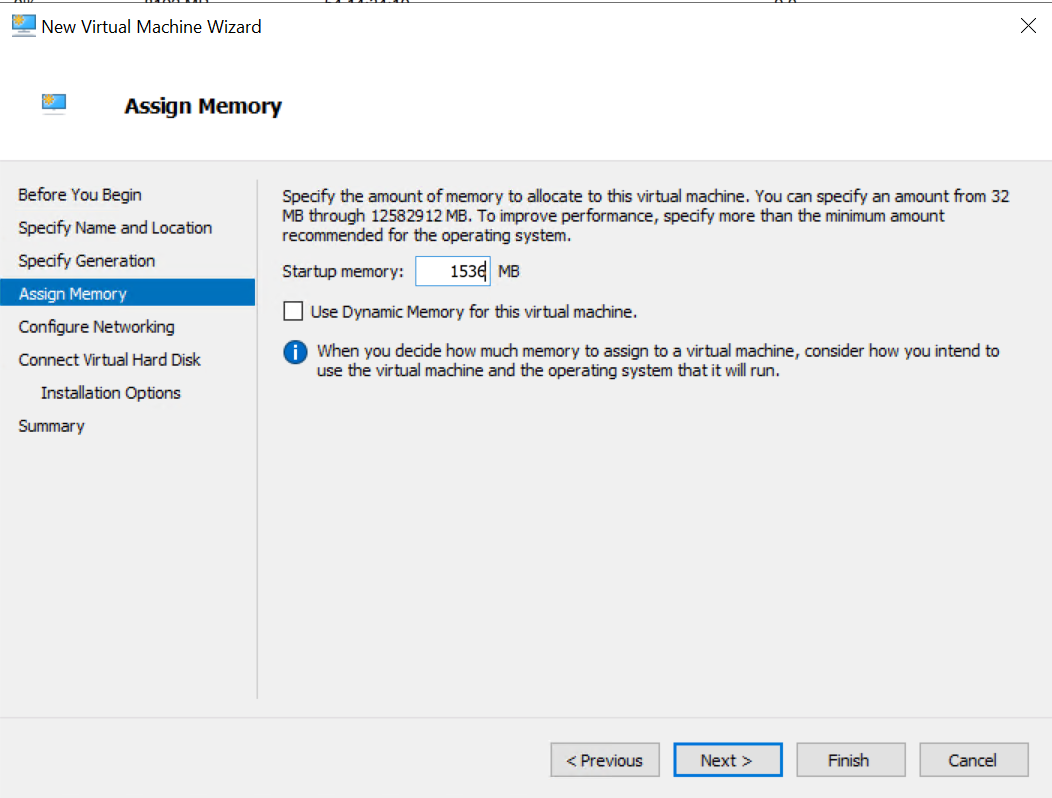
- Assign the memory to the virtual machine.
- Min recommended is 2GB, but in my case I am doing 1.5Gb as it will only be running apache
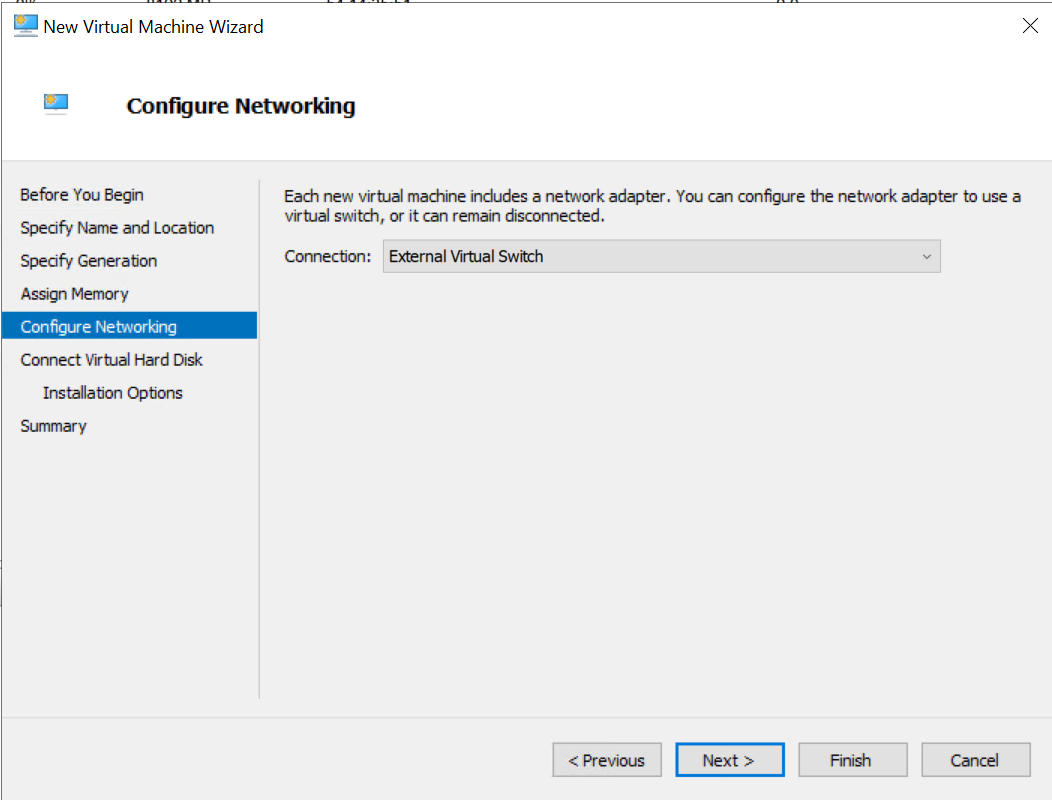
- Configure networking by connecting to the appropriate virtual switch.
- Select Attach Virtual Hard Disk Later

- Click Finish to complete the wizard.
4. Move the VHDX file
In this step, we are going to make a copy of the VHDX file we downloaded and extracted in Step 1 into the Virtual Hard Disks folder
- Navigate to the folder you specified in the Specify name and Location step
- Create a folder called Virtual Hard Disks
- Copy the VHDX into this folder
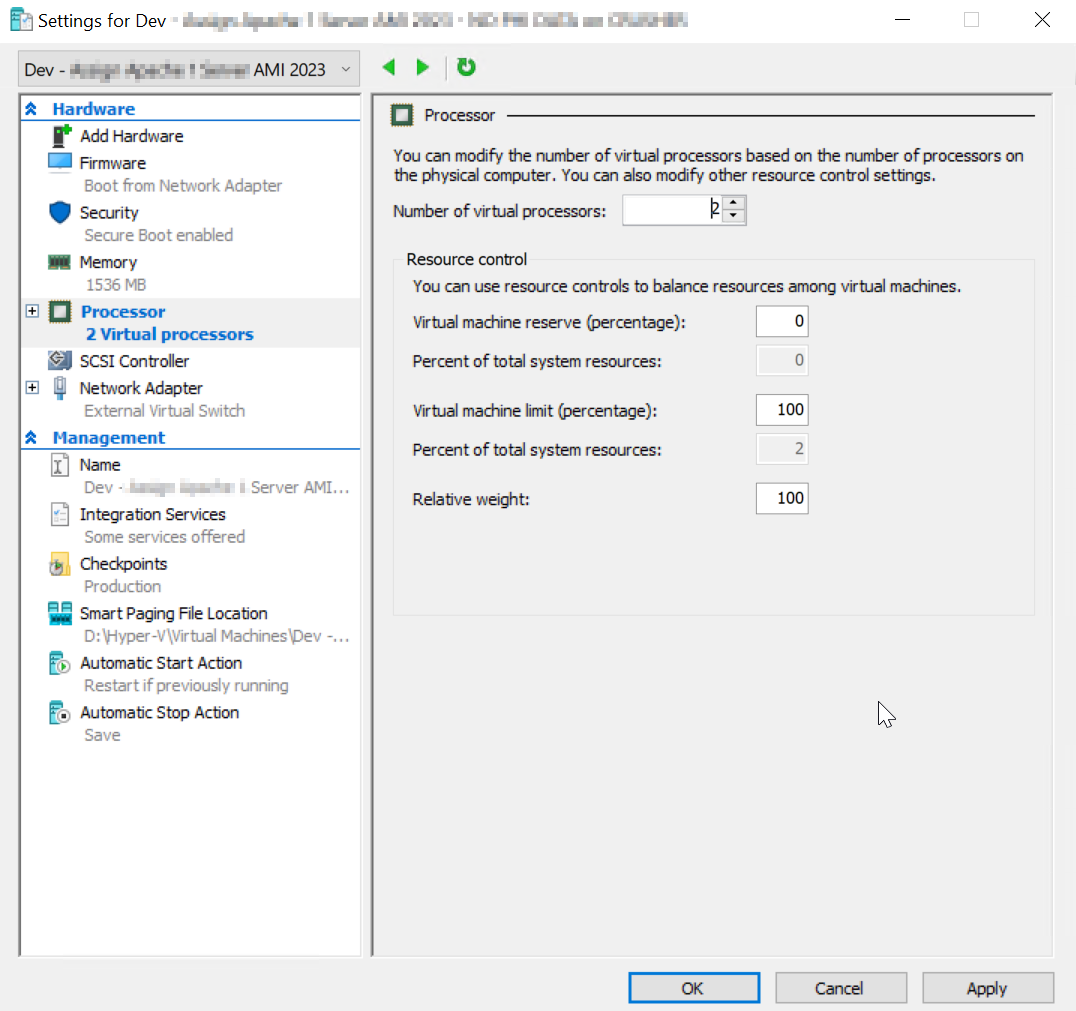
5. Configure the Virtual Machine
Now that the shell Hyper-V instance is created, we have to fully configure it
Once the virtual machine is created:
- Right-click on the virtual machine and select Settings.
- Adjust the processor count.
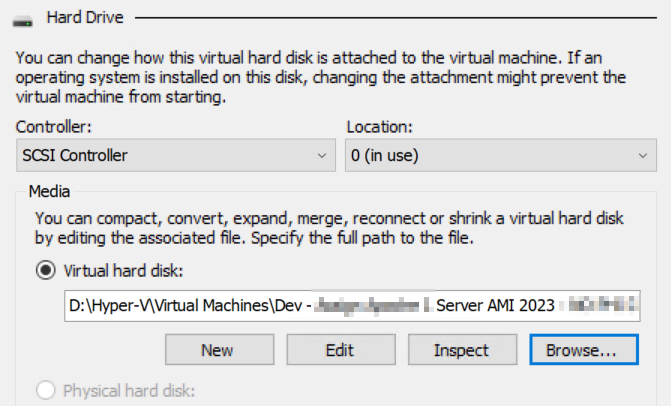
- Add a Hard Drive
- Select SCSI Controller
- Hard Drive
- Add

- Browse to the VHDX file you copied into the Virtual Hard Disks in Step 4
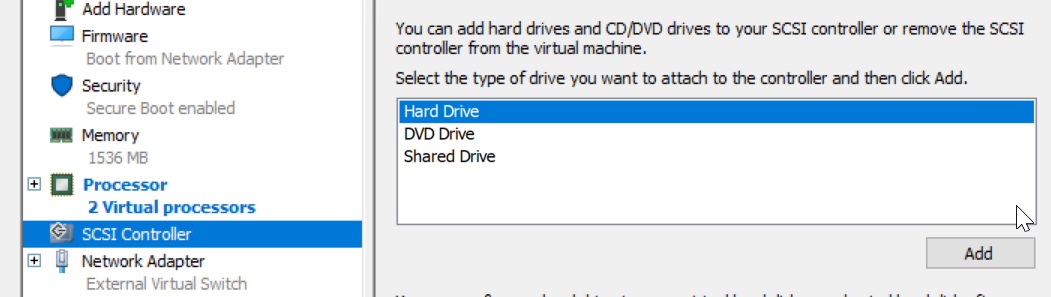
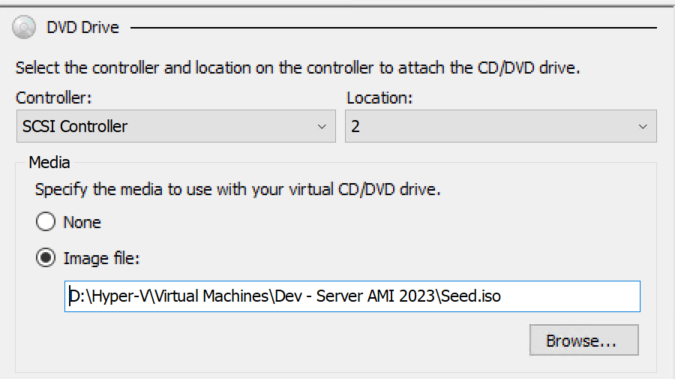
- Add a DVD Drive
- Select SCSI Controller
- DVD Drive
- Add
- Change the location to 2 (or any unused one)
- Select the seed.iso you created above
- Set boot order where DVD is first and Hard Drive is second
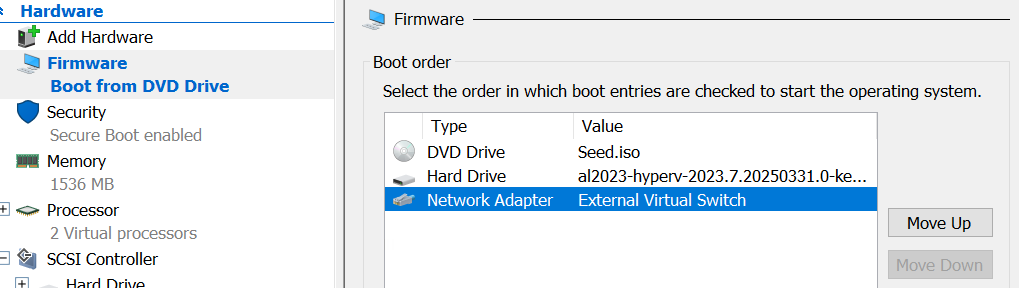
- Disable Secure Boot
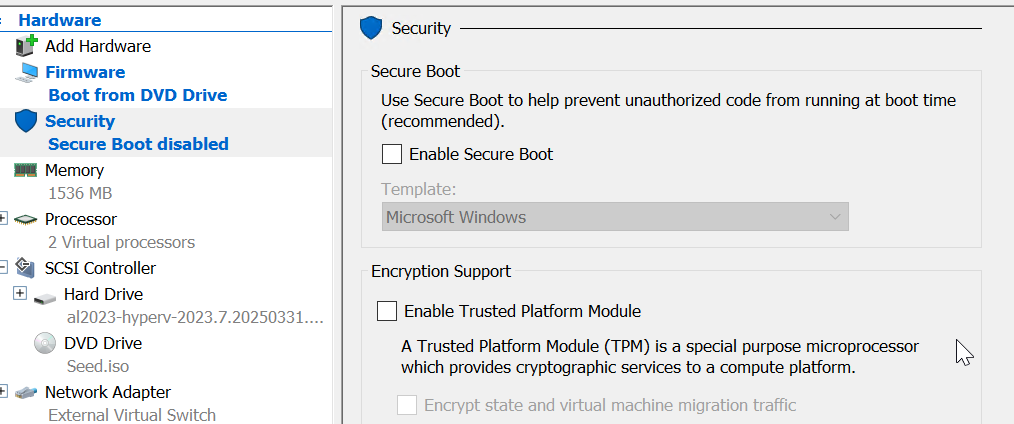
- Click Apply and then OK to save the changes.
6. Start the Virtual Machine
To start your instance:
- Right-click on the virtual machine and select Start.
- Once the machine is running, connect to it by selecting Connect in the Actions pane.
- Log in to the instance using the credentials provided in the seed.iso file
7. Optional – Configure AMI 2023 instance to all for connection with username and password only
By default, Amazon Linux 2023 (AMI 2023) disables password authentication over SSH for security reasons. It only allows key-based authentication. But you can enable password authentication if needed.
⚠️ Before you begin:
Make sure you understand the security implications—password auth is less secure than SSH keys, especially if you’re using weak passwords or exposing the instance to the internet.
🔥 Security note: Enabling password authentication is not recommended in production without strong passwords and a firewall in place.
Steps to enable password authentication in SSH:
- From the Hyper-V Connect window, log into the instance using the credentials provided in the seed.iso file
- Edit the SSH config file:
- sudo nano /etc/ssh/sshd_config
- Find and update (or add) these lines:
- PasswordAuthentication yes
- PermitRootLogin yes # optional: only if you want root login
- Remember to remove the leading # if you want it to be active
- To save changes hit CTRL+O and then enter to commit the changes to the file
- To Exit nano, CTRL+X, but make sure to save before you exit if you want to commit the changes
- Restart SSH
- sudo systemctl restart sshd
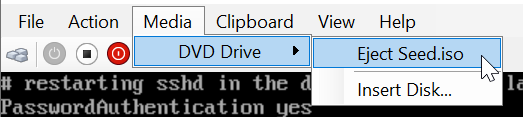
8. Detach CD/DVD from Hyper-V instance
In this step you will eject the DVD Drive as the seed.iso is not longer needed in future boots
- Under Media, DVD Drive, eject the seed.iso
9. Set hostname
This script will set the hostname so that you do not have to change the seed.iso file each time (just update the NEWNAME with the name you want to set the host to):
- sudo hostnamectl set-hostname NEWNAME && sudo sed -i "s/$(hostname)/NEWNAME/g" /etc/hosts && echo "preserve_hostname: true" | sudo tee -a /etc/cloud/cloud.cfg > /dev/null && echo "Hostname set to NEWNAME and made persistent"
10. Hardening Steps (please sure each is right for your environment)
To disable IPv6 on Linux, you can follow these steps:
- Edit the /etc/sysctl.conf file using a text editor with root privileges.
- Add the following line at the end of the file: net.ipv6.conf.all.disable_ipv6 = 1.
- Save the changes and apply them using sudo sysctl -p
Linux Baseline
1. Install AV and Baseline monitoring tools
2. Run these two commands:
a. To disable ICMP (ping):
echo -e "\n# sysctl -w net.ipv4.conf.all.accept_redirects=0
sysctl -w net.ipv4.conf.default.accept_redirects=0
sysctl -w net.ipv4.conf.all.secure_redirects=0
sysctl -w net.ipv4.conf.default.secure_redirects=0" | sudo tee -a /etc/sysctl.conf
b. This script updates /etc/securetty to define which terminal devices the root user is allowed to log in from, enabling access on certain virtual consoles and TTYs while commenting out others:
sudo echo -e 'console\nvc/1\nvc/2\nvc/3\nvc/4\nvc/5\nvc/6\nvc/7\nvc/8\nvc/9\n# vc/10\n# vc/11\ntty1\ntty2\ntty3\ntty4\ntty5\ntty6\ntty7\ntty8\ntty9\n# tty10\n# tty11\n# ttyS0\n# ttysclp0\n# sclp_line0\n# 3270/tty1\n# hvc0\n# hvc1\n# hvc2\n# hvc3\n# hvc4\n# hvc5\n# hvc6\n# hvc7\n# hvsi0\n# hvsi1\n# hvsi2\n# xvc0' | sudo tee /etc/securetty
3. Remove weak ciphers
a. To remove weak ciphers from AMI 2023, you'll need to modify the sshd_config file on your AMI 2023 instance to disable specific ciphers. This involves editing the ciphers section within the sshd_config file and removing any weak or outdated ciphers.
11. Verify the Setup
- After logging in, verify the setup:
- Ensure all services are running as expected.
- Check network connectivity and other configurations.
- Update the system to ensure it is 100% current
- sudo yum update -y
- reboot if necessary for updates
Conclusion
By following the steps outlined in this guide, you should be able to successfully create and run a Hyper-V instance using Amazon AMI 2023. This setup will allow you to take advantage of Hyper-V’s powerful virtualization capabilities while utilizing the robust features provided by AMI 2023.